
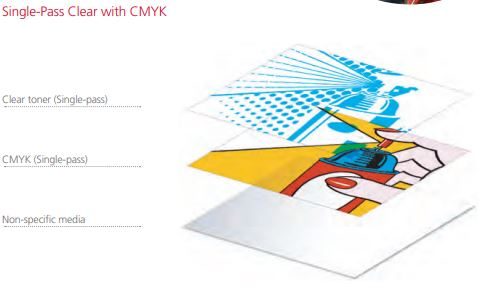
5th Color Setup
Use Clear toner to add some flash to your artwork.
This guide demonstrates how to create and apply a Clear spot color in Adobe® Illustrator or InDesign using vector elements in the layout. In this example Clear will be printed over CMYK to enhance the layout creating effects normal digital printers cannot achieve with CMYK alone.
Only vector-based artwork will be covered in this guide. One PDF will be created to be printed
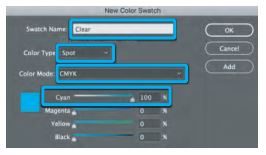
1. Open the layout you are looking to enhance with Clear toner. In this example we are using InDesign. Create a New Swatch by clicking the top right corner of the swatch palette and select New Color Swatch.
- Name the swatch Clear.
- Select Spot Color for Color Type.
- Select CMYK for Color Mode. d. We recommended to choose 100% Cyan to represent the Clear tone

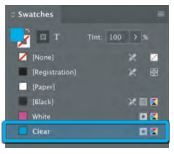
2. The Clear spot color will represent the Clear toner.
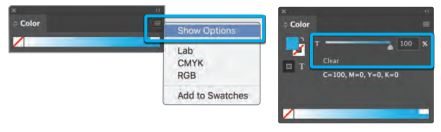
3. The toner density can be adjusted in the color panel on the Density Scale.
- From the Menu bar, select Window then Color to display the Color Panel. If the Density Scale is not displayed, select Show Options.
- Drag the Density Scale or enter the percentage in the box to adjust the density.
4. Isolate and/or duplicate artwork elements.
- Create a base layer, which in this example will be CMYK.
- Duplicate or add artwork of your choosing and place directly on top of itself. It’s helpful to create a new layer for the Clear toner.
- Assign the top-most elements with solid Clear.
- Set the blending mode of the Clear layer to Multiply to allow the Clear to print and mix with the CMYK elements beneath it

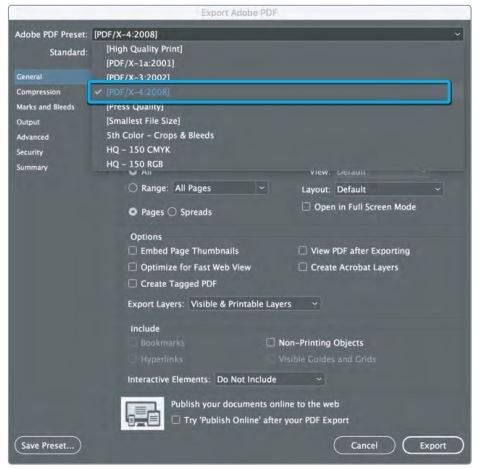
5. With your elements formatted, you are ready to create a PDF.
Export your file as a PDF, File > Export, using the PDF Preset PDF/X–4:2008. This will allow Fiery® Command WorkStation to recognize
where to apply the 5th Color Clear Toner
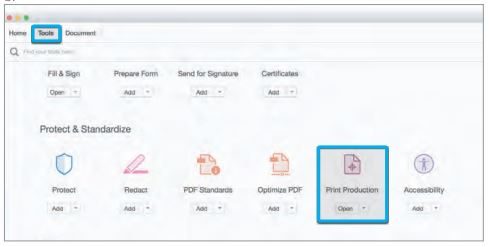
6. With your PDF exported, it’s a good idea to open the file using Adobe Acrobat to confirm not only the presence of the Clear toner, but also that it is blending properly.
- Open the PDF using Acrobat.
- Navigate to the Tools menu and select Print Production.
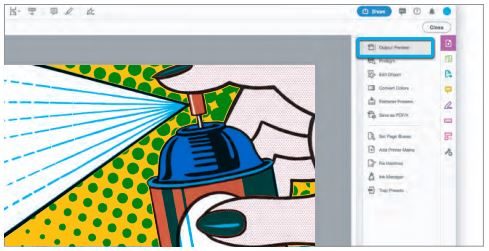
- Select Overprint Preview.
- Confirm Simulate Overprinting is checked.
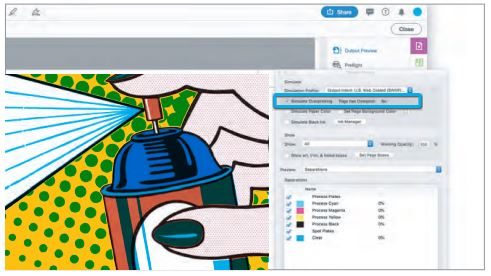
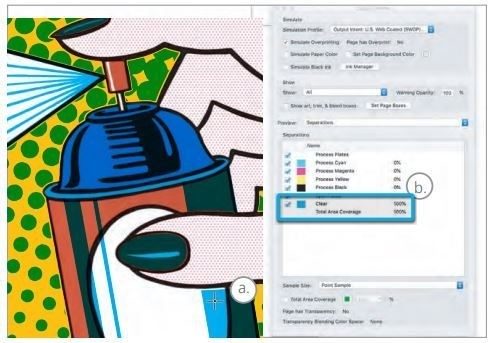
7. Locate the Spot Colors in the Separations window.
- Confirm the presence of Clear Spot Color by mousing over the artwork.
- The percentage will be displayed in the Separations window.
8. With the presence of the 5th Color confirmed and the blending mode properly formatted, you’re ready to print your file.